OpenCV is an open-source image processing and machine learning library. It has many features and can be developed more efficiently than implementing all image processing and machine learning processes from scratch.
Not only is it highly functional, but it is also extremely fast. Internally, OpenCL, SIMD, IPP (Intel Performance Primitive), and threaded parallelization are used to achieve speeds that would be unobtainable with ordinary, straightforward implementation.
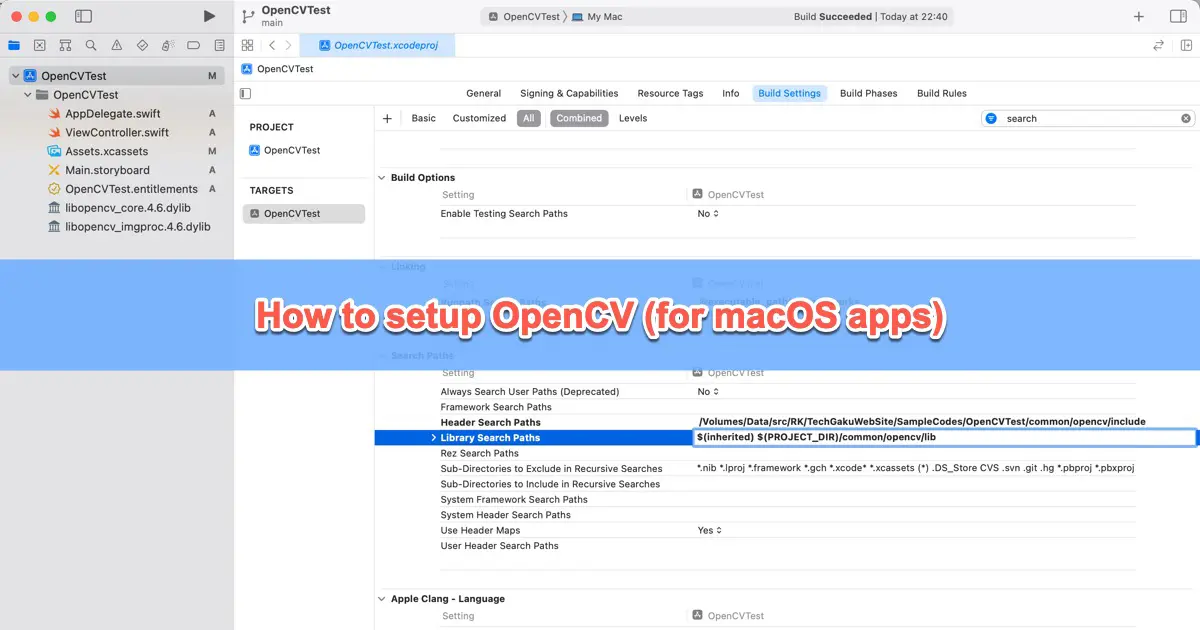
This article will guide you through setting up an OpenCV development environment for developing macOS applications.
For more information on how to set up the iOS application development, see the following article.
Build OpenCV
At the time of this writing, no pre-built binaries were available for macOS, so I built the library from source code. To build OpenCV, you will need the following.
- Xcode
- CMake
- Git
- Python
- NumPy
Python and NumPy come pre-installed with OS versions up to macOS 12.3. Still, they need to be installed manually for macOS 12.3 and later versions. Xcode is available in both App Store and Xip versions.
Install Xcode
For information on how to install Xcode, see the following article.

Install Python and NumPy
Python and NumPy get installed during the Xcode setup. Ensure to set up Xcode appropriately.
Install CMake
CMake now supports Apple Silicon and Xcode 12 or later build systems in v3.19.2. If you are using an older version, you should update it.
CMake can be installed from Homebrew, but we download it from the official site.
There are several ways to do this: if you are under macOS 10.15 and your shell is Bash, edit ~/.profile and add the path as follows. macOS Catalina 10.15 or later, and you have the default zsh as your shell, edit ~/.zshrc.
export PATH=/Applications/CMake.app/Contents/bin:$PATH% cmake --version
cmake version 3.24.0-rc5
CMake suite maintained and supported by Kitware (kitware.com/cmake).Build OpenCV
Given the unavailability of pre-built binaries for OpenCV macOS, you need to download and build the source files.
Download the source file archive from the OpenCV GitHub repository.

Extract the downloaded archive and create the build_opencv and public directories so the directory structure looks like this.
.
├── build_opencv
├── opencv-4.6.0
└── public
build_opencv is the working directory for build, and the public is the directory for the built SDK after. In the terminal, do the following.
% cd build_opencv
% cmake -DCMAKE_BUILD_TYPE=Release -DCMAKE_OSX_DEPLOYMENT_TARGET=11.0 -DCMAKE_OSX_ARCHITECTURES="x86_64;arm64" -DBUILD_EXAMPLES=OFF -DCMAKE_INSTALL_PREFIX=../public ../opencv-4.6.0
CMAKE_OSX_DEPLOYMENT_TARGET is the minimum operating system. Here, 11.0 is specified.
CMAKE_OSX_ARCHITECTURES is the CPU architecture of the binary to build. Here, x86_64 and arm64 are specified to be Universal Binary.
The build takes a little time, but the progress rate is displayed so you can keep an eye on it without worrying.
% make -j7% make installFiles needed when building an application that uses OpenCV are copied to the public folder.
Xcode project settings
To utilize the built library, set up a project in Xcode.
Copy SDK
Copy the complete set of SDK files as follows. Doing this on a per-project basis is more convenient, so we copy them into the project directory. Create a folder named common in the root directory of the project and create a folder named opencv in common. Copy public/usr/local/include and public/usr/local/lib to opencv.
The directory structure is as follows.
OpenCVTest
├── OpenCVTest
│   ├── AppDelegate.swift
│   ├── Assets.xcassets
│   ├── Base.lproj
│   ├── OpenCVTest.entitlements
│   └── ViewController.swift
├── OpenCVTest.xcodeproj
│   ├── project.pbxproj
│   ├── project.xcworkspace
│   └── xcuserdata
└── common
    └── opencv
        ├── include
        └── lib
Header search path settings
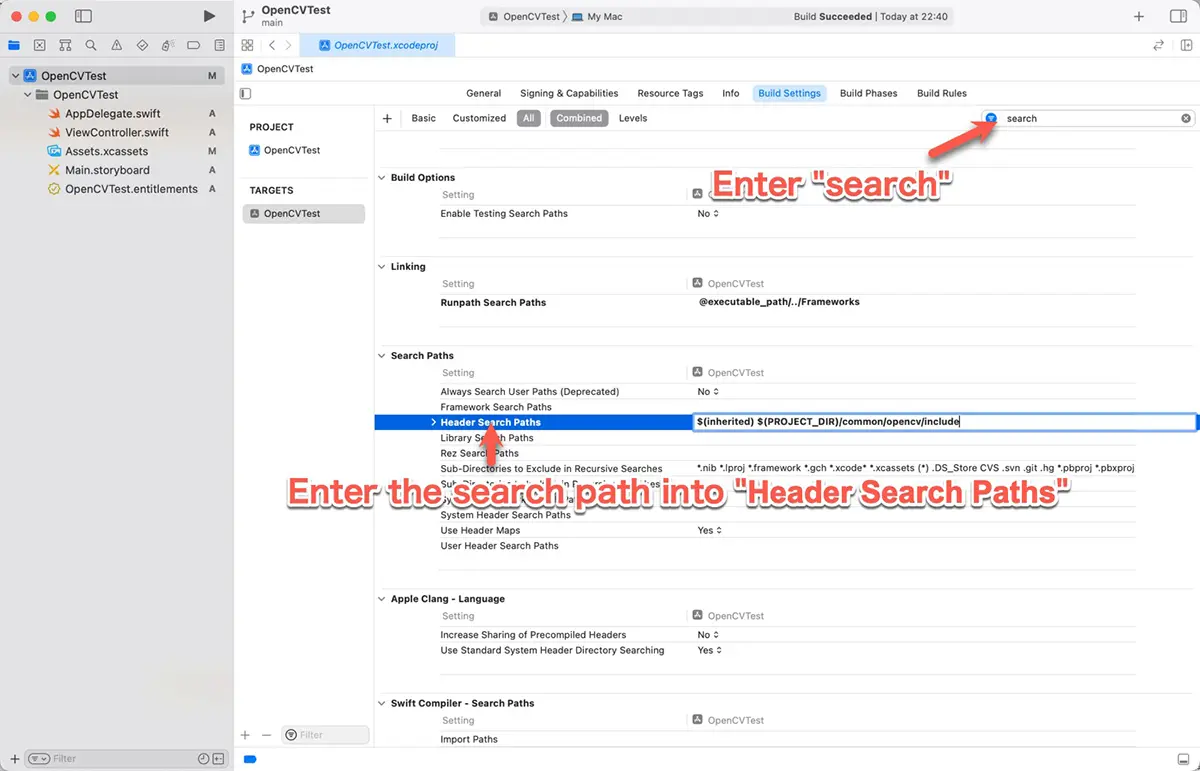
Add a search path to be able to read OpenCV header files.
Add $(inherited) $(PROJECT_DIR)/common/opencv/include to “Header Search Paths” under “Search Paths” in the target settings.
Shared Library Settings
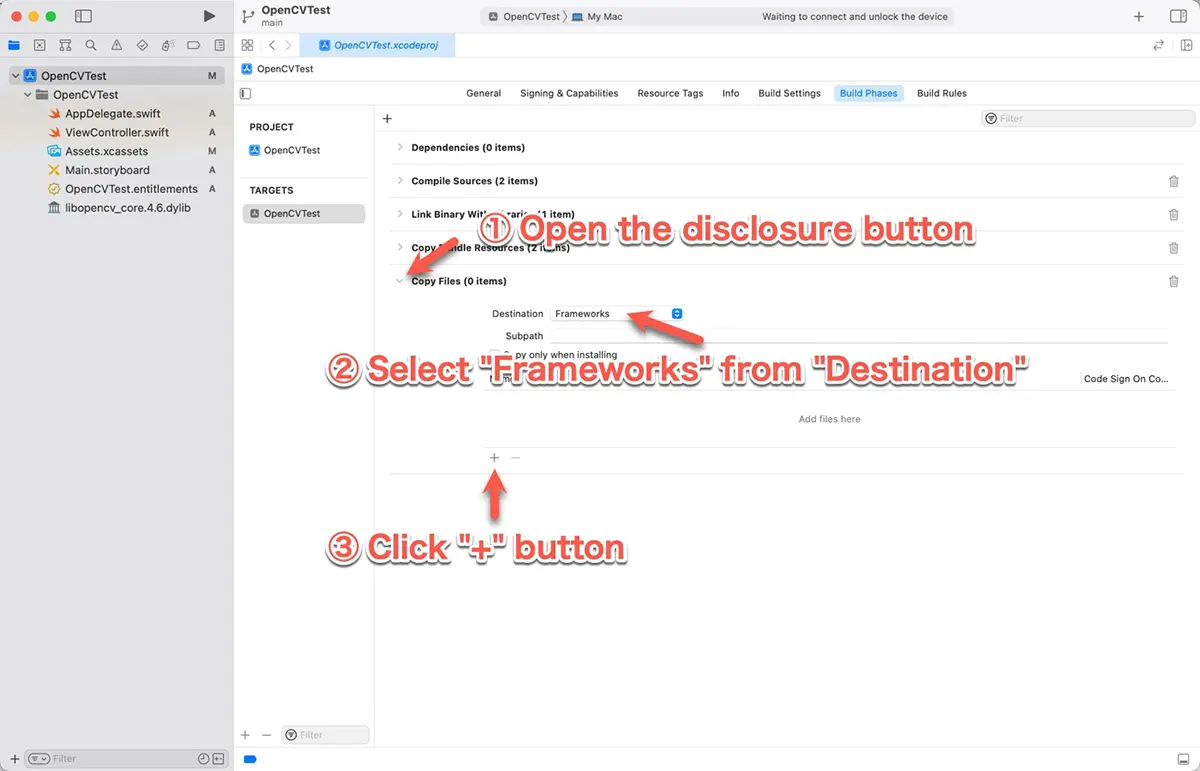
Ensure to copy and configure the shared libraries for use within the application pakcage.
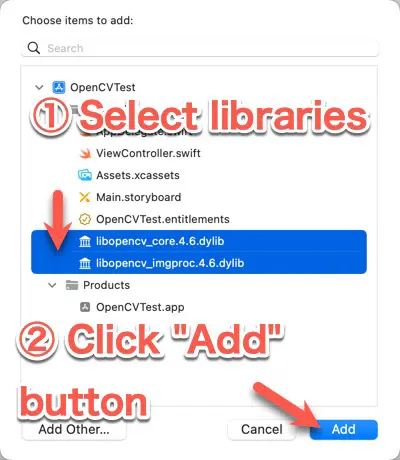
OpenCV is divided into several libraries. Add the library for the function you want to use in your project. For example, for basic image processing, there are two libraries.
libopencv_core.4.6.0.dyliblibopencv_imgproc.4.6.0.dylib
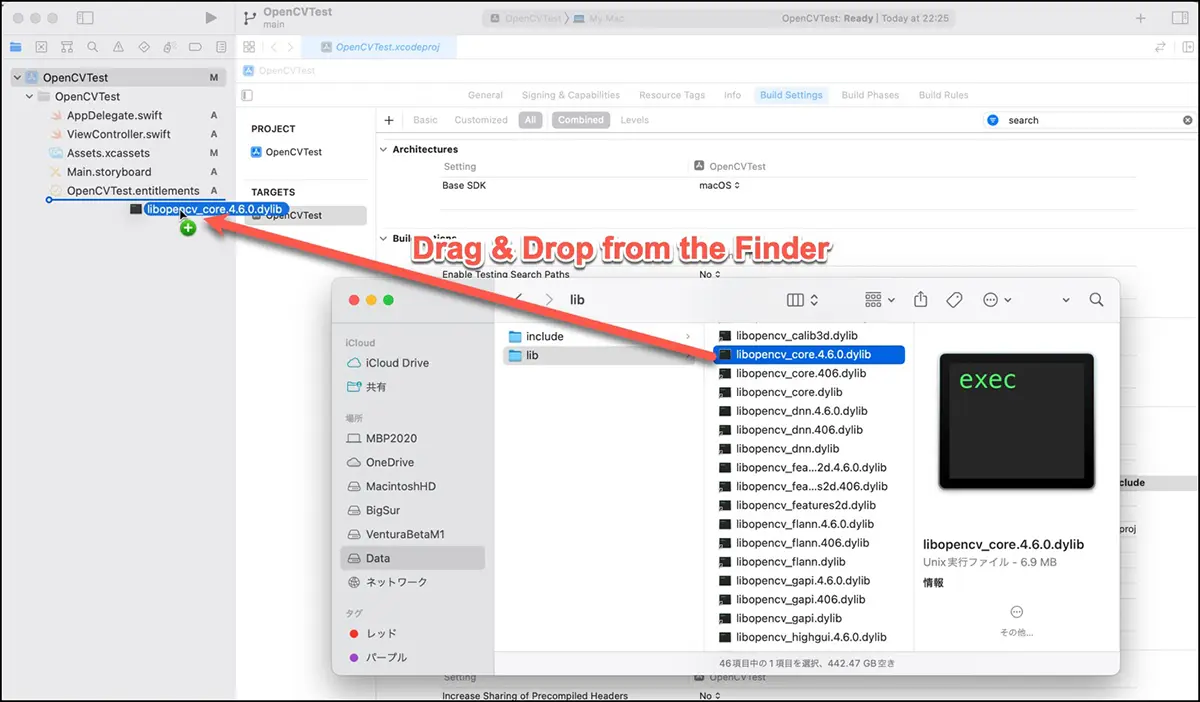
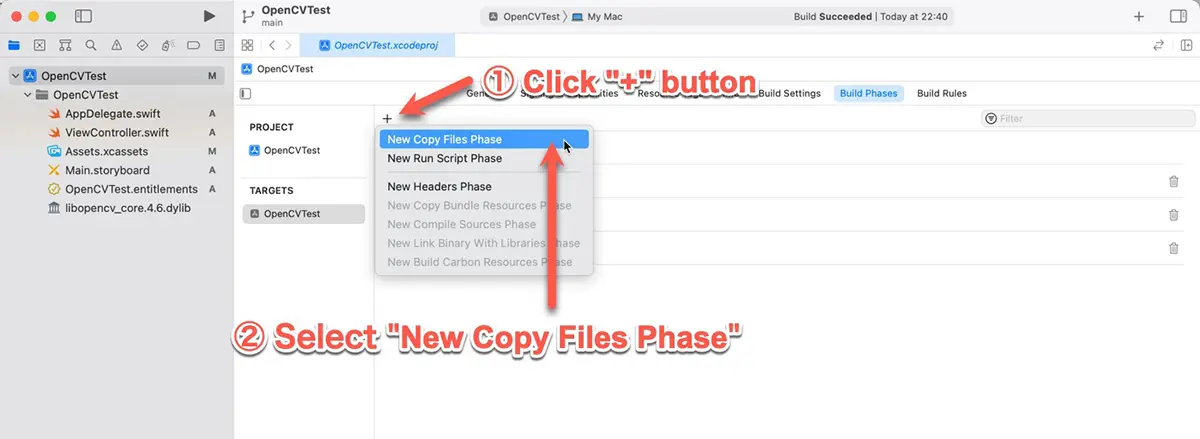
Add a “Copy File” phase to the “Build Phases” section of the target’s settings. If there is already a “Copy File” phase that copies to the Frameworks folder, you can use it.
About Shared Library File Names
The problem may be limited to certain versions, such as 4.3.0. The link information embedded in the shared library has the trailing .0 removed, as in libopencv_core.4.3.dylib. This causes an error that the library cannot be found when linked. The easiest solution is to rename the library file, e.g., libopencv_core.4.3.dylib, to the same name as the link information. A symbolic link is created, but it is safe to delete it.
If you are copying on a per-project basis, you can easily rename it without affecting the others.
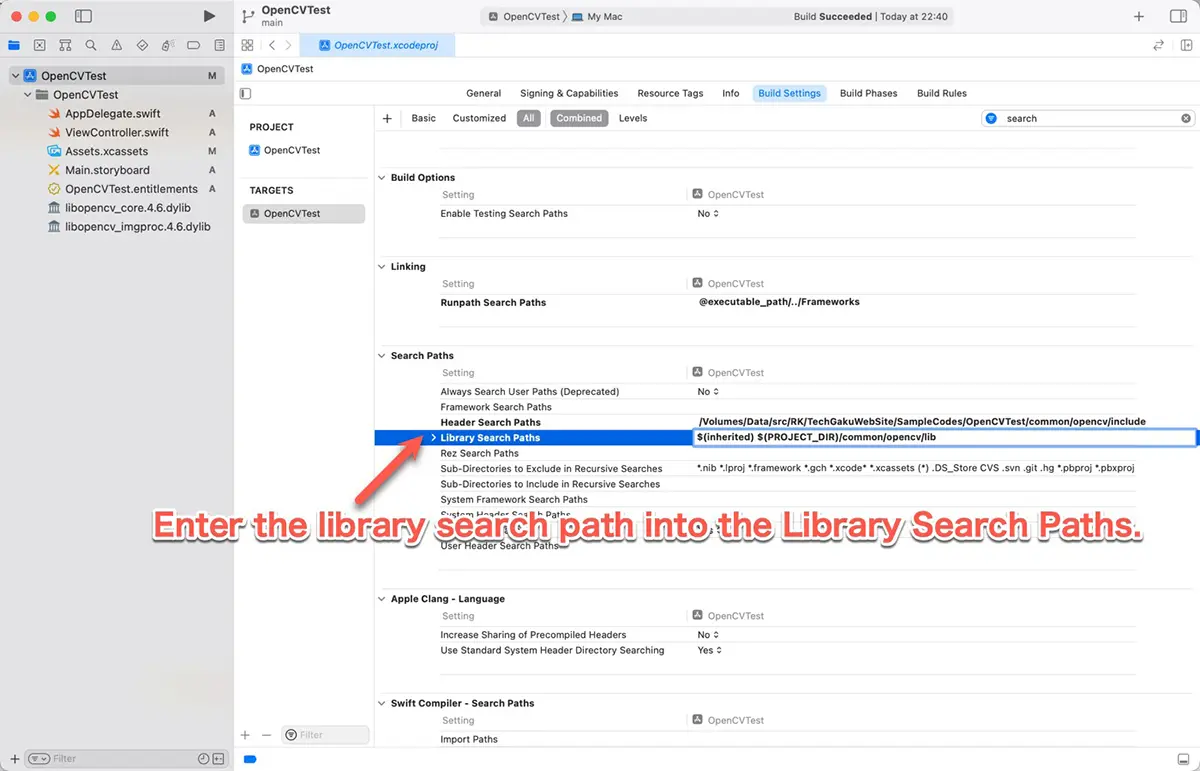
Add a library search path
Add the common/opencv/lib directory to the library search path. Some versions of Xcode also add the library search path when the shared library is added to the project, but some versions do not.
If you get a library not found error, enter $(inherited) $(PROJECT_DIR)/common/opencv/lib in Library Search Paths in the build settings.